
If you’ve ever wondered how do DTF transfers work, you’re not alone. Direct-to-Film (DTF) printing has rapidly become one of the most popular garment decoration methods, helping businesses, apparel brands, and print shops produce vibrant, durable designs without the time-consuming process of vinyl cutting and weeding.
Unlike traditional methods that can limit design complexity or increase labor costs, DTF allows detailed, full-color artwork to be transferred onto a wide range of fabrics quickly and efficiently. Combined with regional fulfillment networks that support fast delivery of custom transfers, businesses can scale production and meet customer demand more effectively.
In this guide, we’ll walk through the entire DTF process—from design file preparation to the finished garment—and explain what makes modern custom DTF transfers such a popular choice for apparel decoration.
What is Direct-to-Film (DTF) Printing?
Direct-to-Film (DTF) printing is a garment decoration method that prints designs onto a special PET film, coats them with adhesive powder, and transfers them to fabric using heat and pressure. The process creates vibrant, durable prints on cotton, polyester, blends, fleece, and other materials.
As the custom apparel market grows through 2026, DTF has become a popular alternative to traditional printing because it requires less setup and supports detailed, full-color designs. Many businesses now use custom DTF transfers ready to press for faster production, while services like gang sheet printing help maximize efficiency by combining multiple designs onto a single transfer sheet.
Digital Design and File Specifications
The quality of a DTF transfer starts long before the printer turns on. Every successful print begins with a properly prepared design file. Poor artwork, low-resolution images, or incorrect file settings can lead to blurry prints, jagged edges, and disappointing results. Understanding the right file specifications helps ensure your design looks as good on fabric as it does on screen.
Preparing High-Resolution T-Shirt Design Files (300 DPI)
One of the most common mistakes in custom apparel production is using low-quality images pulled from websites, social media, or screenshots. While these images may look acceptable on a phone or computer screen, they often contain insufficient pixel data for commercial printing.
Professional DTF printing requires artwork at 300 DPI (dots per inch) at the final print size. This higher resolution ensures crisp details, smooth gradients, and sharp text. A design intended for a 12-inch-wide chest print should be created at full size rather than enlarged later, which can reduce quality.
Transparent backgrounds are equally important. Unlike standard images with white boxes behind them, DTF transfers require clean background removal so only the intended artwork prints. Designers should also isolate edges carefully to eliminate unwanted pixels, halos, or rough outlines around graphics.
For detailed recommendations on file preparation, review this guide on DTF transfer resolution requirements.
Vector vs. Raster: Which Format Wins?
Both vector and raster files can work for DTF printing, but each serves a different purpose.
Vector files (AI, EPS, SVG, PDF) use mathematical paths rather than pixels. This means logos, text, and illustrations can be scaled infinitely without losing quality. They are generally preferred for branding graphics, line art, and clean typography.
Raster files (PNG, PSD, TIFF, JPG) are pixel-based and better suited for photographs, textures, and highly detailed artwork. However, they must be created at the correct resolution from the start.
Recommended canvas settings include:
If you’re creating artwork from scratch or upgrading existing designs, this guide to the best design tools for DTF-ready artwork can help you choose the right software.
For businesses working with existing logos, learning how to create a print-ready file is equally important. This resource explains how to convert a logo to a print-ready DTF file.
The Role of the RIP Software and the White Ink Underbase
Once a design file is uploaded, specialized RIP (Raster Image Processor) software prepares it for production. Think of RIP software as the translator between the design file and the printer.
The RIP system analyzes artwork, controls color output, manages print settings, and generates the white ink layer required for DTF transfers. During printing, the machine typically lays down the CMYK color layer first. Immediately afterward, it prints a high-opacity white ink underbase behind the design.
This white underbase serves two important purposes:
- It increases color vibrancy on dark garments.
- It creates a solid foundation that improves opacity and detail.
Without the white layer, colors can appear washed out or transparent when applied to colored fabrics. The combination of CMYK pigments and a precisely calculated white underbase is what allows DTF transfers to produce bright, durable graphics on everything from black hoodies to performance apparel.
Simply put, the design file may start the process, but RIP software and white ink technology are what transform digital artwork into professional-quality transfers ready for pressing onto garments.
The Automated Printing Stage
Once the artwork has been prepared and processed through RIP software, the design moves into the actual production phase. This is where the digital file becomes a physical transfer through a series of carefully controlled DTF printing process steps. Modern DTF systems combine precision printing, powder application, and curing technologies to produce custom DTF transfers ready to press with consistent color accuracy and durability.
How the Industrial DTF Printer Operates
Industrial DTF printers work by printing directly onto a continuous roll of specialized matte-coated PET film. As the film advances through the machine, the print head moves back and forth, depositing layers of CMYK ink according to the design data received from the RIP software.
The printer first applies the color layer, followed immediately by a white ink underbase that creates opacity and vibrancy when the design is transferred onto fabric. This sequence is critical because the white layer acts as the foundation that allows colors to remain bright on dark garments.
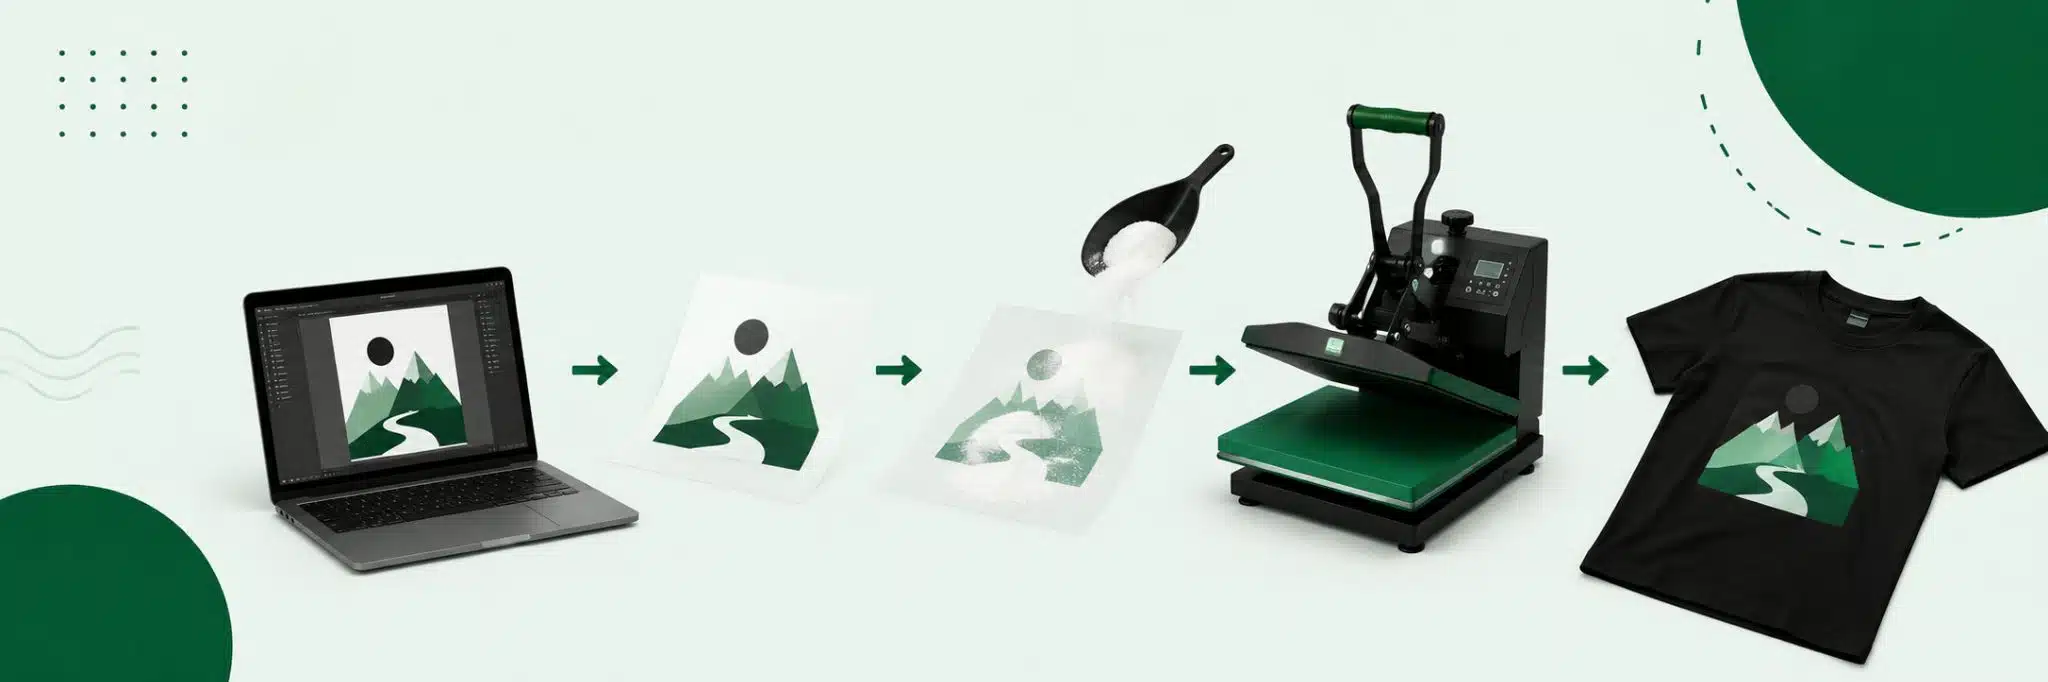
The basic DTF printing process steps typically include:
- Preparing the artwork and RIP settings
- Printing CMYK colors onto PET film
- Applying the white ink underbase
- Coating the design with adhesive powder
- Curing the powder using controlled heat
- Pressing the transfer onto the garment
Many businesses improve production efficiency by using gang sheet printing, which allows multiple designs to be arranged on a single sheet of film, reducing waste and lowering production costs.
For the best results, artwork should be optimized before printing. This guide on how to prepare an image for DTF printing explains the key preparation steps.
Controlling Temperature and Humidity for Perfect Pigment Absorption
Printing quality depends on more than just the printer itself. Environmental conditions inside the production facility play a major role in transfer quality.
Temperature and humidity directly affect how inks interact with the PET film surface. If humidity levels are too high, moisture can interfere with ink adhesion and drying. If the environment is too dry, static electricity may develop, leading to print inconsistencies and film handling issues.
Maintaining stable atmospheric conditions helps prevent:
- Ink pooling on the film surface
- Color bleeding
- Uneven white ink coverage
- Poor adhesive bonding
- Inconsistent transfer quality
After printing, the adhesive powder must be properly cured before the transfer is applied to a garment. The correct DTF powder curing temperature varies depending on equipment and materials, but maintaining precise curing conditions is essential for strong adhesion and long-term durability.
For a deeper look at recommended settings, see this guide on DTF printing temperatures.
When temperature, humidity, printing, and curing conditions are carefully controlled, manufacturers can consistently produce high-quality custom DTF transfers ready to press that deliver vibrant colors, sharp details, and excellent wash durability.
Powdering and the Curing Process
Applying the Thermoplastic Polyurethane (TPU) Adhesive Powder
Once the vibrant CMYK pigments and thick white base layers are deposited, the wet PET film moves directly into an automated shaker unit. Here, a specialized hot-melt TPU adhesive powder is applied across the moving sheet. Because the powder only adheres to wet moisture, it clings precisely to the white ink underbase while bouncing completely off the unprinted, transparent areas of the film. Automated beating arms then shake away any excess powder, ensuring clean edges and preventing stray adhesive spots on your final garment.
Mastering the DTF Powder Curing Temperature
To transform this raw powder into a permanent textile bond, the film must go through a precise thermal reaction. Achieving the correct DTF powder curing temperature is critical; the powdered film is routed through a specialized conveyor dryer tunnel or placed beneath a heat-press hover station at approximately 230°F to 285°F (110°C to 140°C) for 2 to 3 minutes.
This thermal window melts the granular TPU powder until it transforms into a uniform, glossy, “orange-peel” texture. For large-scale decorators utilizing premium bulk wholesale printing pipelines, locking in this temperature window guarantees that the finished transfers remain highly flexible, durable, and completely crack-resistant through dozens of wash cycles.
The Heat Press Application
Sourcing the Best Fabric Blends for Custom Printing
The primary competitive advantage of DTF transfers over traditional DTG or sublimation setups is its incredible versatility. While sublimation requires pure polyester and DTG demands natural cotton, DTF bonds seamlessly to almost anything. It serves as the ideal choice for the best fabric blends for custom printing, including 100% cotton, pure polyester, nylon, canvas, and heavy fleece.
Time, Temperature, and Pressure: The Golden Triangle
To achieve a retail-grade bond, you must balance the three core variables of heat application. The standard parameters require a commercial heat press set between 300°F to 320°C (149°C to 160°C) for 12–15 seconds under medium-to-firm pressure. This exact window ensures the adhesive fully melts into the textile weaves without scorching the garment.
The Critical Peel: Hot Peel vs. Cold Peel PET Films
Rushing the final stage can instantly ruin a complex design. The mechanical properties of your carrier sheets dictate your removal method:
- Hot Peel Films: Removed immediately after opening the press (within 2–3 seconds) while the chemical matrix is still warm, maximizing production speeds.
- Cold Peel Films: Must cool completely to room temperature before removal. Peeling too early separates the ink from the adhesive layer, destroying the print registration.
Why Outsourcing Your Prints Beats Buying Expensive Equipment
Many emerging clothing brands look at the base price tag of an industrial printer and assume buying equipment is the fastest path to profitability. However, the true custom t-shirt printing machine cost extends far beyond the initial hardware purchase.
Commercial printing lines carry substantial hidden operational overhead that can quickly drain your margins:
- Frequent Printhead Clogs: DTF inks rely heavily on heavy white titanium dioxide pigments. These settle quickly and clog lines without constant, automated daily ink circulation.
- Expensive Component Failures: If a machine sits idle for even a few days, dried ink can permanently ruin expensive printheads, resulting in thousands of dollars in sudden replacement costs.
- Strict Climate Controls: Commercial equipment demands strict, 24/7 environmental monitoring. Your workspace must be kept at precise humidity and temperature levels to prevent ink pooling.
- Rising Labor Overhead: Keeping an industrial printer running cleanly requires significant labor hours dedicated entirely to manual daily maintenance cycles.
Leveraging Custom DTF Transfers Ready to Press
To protect their profit margins and eliminate operational headaches, smart local decoration shops and national streetwear brands are shifting away from owning in-house hardware.
Instead, they rely on commercial contract print pipelines to source premium custom dtf transfers ready to press. This strategic shift offers several major business advantages:
- Zero Infrastructure Hassle: You completely bypass hazardous chemical maintenance, ink expiration risks, and costly machine downtime.
- Predictable Pricing: Ordering pre-cured transfers converts unpredictable machinery overhead into a highly predictable, per-unit variable expense.
- Total Strategic Focus: Your team can dedicate 100% of its energy to creative graphic design, brand marketing, and expanding sales channels, while leaving the complex industrial chemistry to a specialized production partner.
The Smarter Path to Scale
Direct-to-Film (DTF) technology has fundamentally rewritten the rules of modern garment decoration. By combining precision digital file preparation, automated TPU powdering, and highly versatile heat press mechanics, DTF allows brands to bypass the strict material limitations of sublimation and DTG.
While the chemical printing pipeline requires strict operational control, you don’t need to absorb the high machine maintenance and climate overhead yourself. Utilizing high-quality custom DTF transfers ready to press gives your brand a predictable, low-risk manufacturing foundation—allowing you to focus your energy entirely on creative design, impactful marketing, and scaling your sales footprint.
Frequently Asked Questions
How many washes do custom DTF transfers last before cracking?
When printed with premium inks and properly cured, high-quality DTF transfers can easily last between 50 to 100 wash cycles before showing signs of cracking or fading. Because the TPU adhesive powder forms an incredibly flexible, rubber-like bond within the fabric fibers, the graphic stretches naturally with the garment. To maximize the lifespan of your prints, always wash the decorated apparel inside out in cold water and tumble dry on a low-heat setting.
Can you apply DTF transfers with a standard household iron?
While it is technically possible for small hobbyist projects, using a standard household iron is highly discouraged for commercial apparel lines. Retail-grade DTF transfers require a flawless equilibrium of three variables: consistent high heat, relentless downward pressure, and exact timing.
Household irons suffer from uneven heating elements, lack a reliable temperature readout, and cannot deliver the heavy, uniform physical pressure needed to drive the melted adhesive deep into the textile weaves. For professional results, always use a commercial swing-away or clam-shell heat press.
Why does my DTF transfer feel stiff or heavy on thin fabrics?
If your finished graphic feels overly rigid, dense, or heavy on lightweight garments, it is usually caused by one of three production oversights:
- Excessive White Ink Underbase: Setting the white ink layer percentage too high in your RIP software creates a thick plastic-like barrier.
- Over-Powdering: Applying too much TPU adhesive powder or failing to aggressively shake away the excess before curing.
- Over-Pressing: Crushing the film with excessive pressure for too long can over-solidify the adhesive layer, stripping away its natural textile flexibility.
What causes a DTF print to bubble or peel off after the first wash cycle?
Early bubbling, lifting, or peeling is almost always tied to faulty application parameters during the heat press stage. The most common culprits include:
- Under-Curing the Powder: If the TPU adhesive powder wasn’t completely melted into a glossy “orange-peel” texture during the heating phase, it won’t bond permanently with the garment fibers.
- Insufficient Pressing Pressure: If your heat press is set to light pressure, the adhesive cannot properly anchor into the knit.
- Trapped Fabric Moisture: Failing to pre-press your t-shirt for 3 to 5 seconds before applying the transfer traps ambient moisture inside the fabric. When pressed, this moisture turns into steam, creating pockets and bubbles beneath the ink layer.